- 77
- 279
- Joined
- Nov 29, 2018
So I had this question posed to me in the Reflective Air Jordan VII thread and I gave a small write up of it, but decided to do a step by step guide/thread.
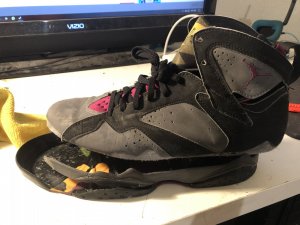
There’s plenty of guides of swapping Jordan’s from 1-5 and 6,8,9 but rarely much has been seen on 7s. Retro 7s have a bulge on the back of the heel that drives me insane, so being able to keep the original sole is always a plus.
Items needed:
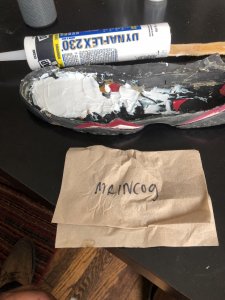
(2) (per shoe) of Dynaflex 230 (clear perferably, but white works as well). Can be found at most if not all Home Depot’s for 4 bucks.
(1) painters stick or object to remove calk. A calking gun would also work but I don’t have one. Free at Home Depot. Just ask the paint department.
(1) card or plastic object to smooth the calk inside of sole.
Time. This is very time consuming as you have to wait for each layer to dry. Heavier layers may not dry completely and you’ll have to restart or wait ages.
Step one:
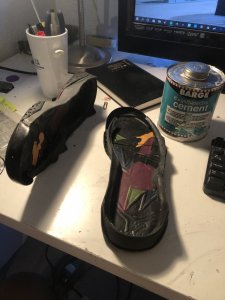
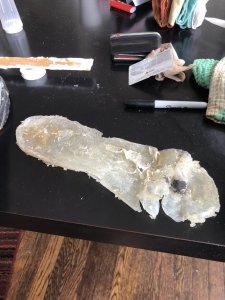
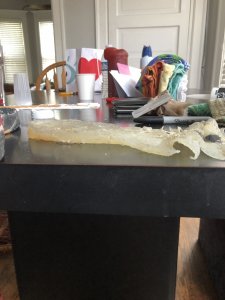
7s have a two part sole that holds the polyurathane. When they start to crumble the outer sole/ wall will separate from the actual sole of the upper and the sole that touches the ground. The two soles can be glued together with Barge Inifnity or Super Stick. Clear out all of the old polyurathane and wipe down the inside of the sole after reapplying glue.
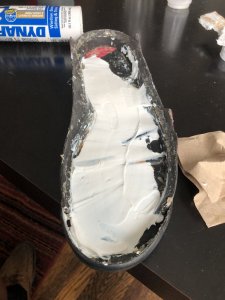
Step two: apply then layers of calk to the inside of the sole. I chose clear calk because it’s easier to know when it’s dry, as you will be able to see through to the bottom of the sole.
Apply as many layers as possible until you reach slightly below the line, where the upper and the sole meet. You do not need to go past the line as you will want some room to properly have the upper and sole line up.
Use the card or small plastic surface to smooth out the calk and remove any air pockets.
Step three: Once all of your layers are completely dry you can treat the remainder as if you were doing a sole swap. The calk when dry will adhere to the barge cement and the upper and you will be able walk as normal.
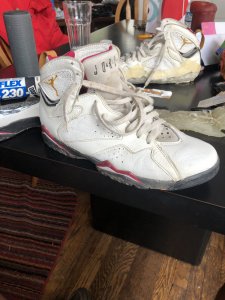
The calk will bend to you shape of your foot, but will hold and never break down. The dynaflex is water resistant and this pair of mine survived a downpour many of times (I’ve walked through most of Brooklyn and Times Square with them)
Downsides:
If your glue job isn’t perfect and you want to redo it, you will end up removing the calk that is inside. I’ve found no way of getting around this as that is why I’m doing this again. My right shoe was fine glue wise and has been going strong for 7 months.
*Ill apply photos to each step once I’m at my home computer*
There’s plenty of guides of swapping Jordan’s from 1-5 and 6,8,9 but rarely much has been seen on 7s. Retro 7s have a bulge on the back of the heel that drives me insane, so being able to keep the original sole is always a plus.
Items needed:
(2) (per shoe) of Dynaflex 230 (clear perferably, but white works as well). Can be found at most if not all Home Depot’s for 4 bucks.
(1) painters stick or object to remove calk. A calking gun would also work but I don’t have one. Free at Home Depot. Just ask the paint department.
(1) card or plastic object to smooth the calk inside of sole.
Time. This is very time consuming as you have to wait for each layer to dry. Heavier layers may not dry completely and you’ll have to restart or wait ages.
Step one:
7s have a two part sole that holds the polyurathane. When they start to crumble the outer sole/ wall will separate from the actual sole of the upper and the sole that touches the ground. The two soles can be glued together with Barge Inifnity or Super Stick. Clear out all of the old polyurathane and wipe down the inside of the sole after reapplying glue.
Step two: apply then layers of calk to the inside of the sole. I chose clear calk because it’s easier to know when it’s dry, as you will be able to see through to the bottom of the sole.
Apply as many layers as possible until you reach slightly below the line, where the upper and the sole meet. You do not need to go past the line as you will want some room to properly have the upper and sole line up.
Use the card or small plastic surface to smooth out the calk and remove any air pockets.
Step three: Once all of your layers are completely dry you can treat the remainder as if you were doing a sole swap. The calk when dry will adhere to the barge cement and the upper and you will be able walk as normal.
The calk will bend to you shape of your foot, but will hold and never break down. The dynaflex is water resistant and this pair of mine survived a downpour many of times (I’ve walked through most of Brooklyn and Times Square with them)
Downsides:
If your glue job isn’t perfect and you want to redo it, you will end up removing the calk that is inside. I’ve found no way of getting around this as that is why I’m doing this again. My right shoe was fine glue wise and has been going strong for 7 months.
*Ill apply photos to each step once I’m at my home computer*
Attachments
-
 97D1420E-95AA-45CE-BE13-AB441B45BAEC.jpeg321.8 KB · Views: 91
 -
 C38CB4D2-9A93-4444-B4FC-9A4145490243.jpeg265.3 KB · Views: 88
 -
 AD6B1362-E3ED-465E-83AC-CB31C3DC6233.jpeg300.4 KB · Views: 94
 -
 EC6C46FB-989D-4FDD-9B5F-A029D4647513.jpeg296.2 KB · Views: 97
 -
 946DD594-8222-4A9B-8488-9ACC598F7055.jpeg221.6 KB · Views: 106