Official CAR AUDIO Thread FAQ added

Originally Posted by bxbadboy90

good looks mr monday night
You need sound deadening for the doors, rear deck, and trunk lid...

http://www.secondskinaudi...n-mat/damplifier-pro.php

Buy as much as you can afford... i would atleast pick up a shop pack...the more, the better tho...


Originally Posted by Jwill JR

Originally Posted by MR MONDAY NIIGHT

doesn't the maxima already have nav?

lookin' at a pic of the dash, it's gonna cost alot of money to put a double din in there

it has the screen, but it does not have the navi equipped...
This will work
31YRAUibsnL._SL500_AA280_.jpg

http://www.amazon.com/Met...B002R0DWT2/ref=de_a_smtd

what are your musical taste?
 
^^nice find thanks... musical taste differs... I listen to alot of Christian stuff, I listen to alot of podcast so thats the reason I need the Ipod hook up,but as far as music its hip-hop, and stuff like POD, Blindside, Skillet... so not one certain type, but those would be the main two... hip-hop and altern.
 
FAQ.


How can I destroy my speakers?


http://http://
Spoiler [+]
http://
When asked how one can destroy speakers we reply by explaining there is only three real ways. The first is thermally and this is the most commonly occurring. Breaking the equation down further there are only two ways to thermally destroy a speaker (and crossover in the case of split systems); over powering and under powering. Over powering the speaker with way too much power will cause the voice coil wire (which is receiving more current through it then its rated too) to melt and short on the magnet. This is simple enough to understand so if you have a 200 watt subwoofer then you don't feed it 2000 watts. However much more dangerous is under powering the speaker because the end result will be the same but it happens in a slightly slower and sneakier way.

In audio systems where you hear speakers 'distorting', it's not the speaker that is causing the struggle, it's the amplifier. Speakers are quite simple devices and don't discriminate. They cannot tell the difference between harmonic sound and rough distorted noise and simply reproduce whatever wave signal is given to them regardless of what it may sound like. When you ask the amplifier to do its job (by turning the volume up) it takes a comparatively small sound wave and amplifies it before sending this bigger signal to the speakers. If you ask your amplifier to produce more than it's capable of it will attempt to achieve this request but the output sound wave becomes rough and distorted as the amplifier reaches its power output threshold. Pushing it beyond this point causes the amplifier to begin clipping. When a woofer is driven hard by a high power amplifier there is a significant amount of current flowing through the voice coil. The voice coil has resistance and therefore a voltage drop across it occurs. This means that there may be a great amount of power being dissipated in the form of heat within the voice coil. When a speaker is driven with clean power the cone moves back and forth a great deal. You'll notice many speakers have perimeter vents in the basket and pole vents in the back. The speakers movement forces air to flow in through these perimeter vents and into the magnetic gap (the area where the voice coil lives and moves) before flowing out the pole vent (and hopefully taking the heat with it). When the cone moves forward out of the basket, the area that's under the dust cap and around the voice coil increases in volume. This pulls cool air into the magnetic gap. When the woofer moves the other direction, the chamber size is reduced and the hot air is forced out of the pole vent. This air flow cools the voice coil.
Click on images to enlarge​
When a relatively low powered amplifier is driven into clipping (to the point of full square wave sometimes) the voltage delivered to the voice coil no longer resembles a sine wave because the amplifier clips the top and bottom of the wave off (because it's beyond what it can do). While this output is clipped (the flat spot on the top of the wave) the voice coil in your speaker is not moving but instead remains almost stationary at this time with high current still running through it. Because the voice coil is not moving it is not being cooled sufficiently (remember the coil is driven by a linear motor therefore the more voltage applied to the voice coil, the further it moves). In the image above you see that at points A, B, D, E, F and H the voltage is changing causing the voice coil to move in the gap and therefore pull in fresh cool air. At points C and G, the voice coil is still moving a little but this is only due to momentum. This is not enough to cool efficiently and there is still full current flowing through the voice coil. Since the displacement of the voice coil (and the relating airflow around it) is no longer proportional to the heat being generated, the voice coil will overheat. This excess heat (just as with overpowering) causes the voice coil to melt its insulation and the former to physically distort. Basically the whole motor burns apart as adhesives start to fail. However before you stress too much it should be noted that many reputable manufacturers underrate speakers so generally slight clipping isn't a problem. Severe clipping is more likely to cause a problem.

The second way to destroy a speaker is physically and this can also be broken down into two facets. The first physical facet is what we call bell mouthing. This is where the voice coil and former are driven so hard they actually extend beyond their normal range of motion and impact the back plate on the bottom of the speaker. This continual impacting causes the bottom of the voice coil to bend out like the bottom of a bell and this eventually cause the coil and corner to become so physically disfigured that it rubs on the magnet surrounding it and eventually comes to a complete halt. This isn't just restricted to subwoofers either. Tweeters playing frequencies that are too low tend to suffer from this phenomenon too because they're not designed for high excursion. The second facet of physically destroying a speaker is to punch way too much power into it fast and this causes what us engineering types like to call critical structure failure. That is a technical way of saying you'll simply tear the surround and/or spider(s) and pop the cone and motor assembly right off the frame. To 'blow the guts out of the speaker' is the more Aussie way of saying it. This is commonly witnessed during sound pressure level competition because the drivers are being pushed to their absolute limits.

The third and final way to destroy a speaker is an age old enemy of technology; sunlight. Nothing breaks down and erodes foam surrounds faster than sunlight (well except bugs like moths but you shouldn't have them living in your car). After only a few months of direct sunlight your speaker surrounds will be significantly weakened and may eventually begin cracking or simply tear all together. Butyl rubber surrounds are more resistant to sunlight but eventually all materials succumb to the mighty sun. The best thing to do with shelf speakers is place some grille cloth over the factory grilles. This helps in resisting ultra-violet rays from the sun penetrating through to the speaker.

These are the three main causes of most damaged speakers. The end result is the same with all three methods but you tend to get a lot more warning with thermal or sunlight damage. Physically speaking though; if you're pushing your speaker way beyond what its rating dictates you'll get very little warning before your speakers starts to smoke or literally explodes.
What is severe clipping?


http://http://
Spoiler [+]
http://
Now that you know about clipping (see above) we move to severe clipping (a.k.a square wave). It always amazes me when I hear some idiot driving down the road and the audio is clearly distorted (you know what I mean). Many people drive their amplifiers into what could be called a square wave output (white line below). When an amplifier is pushed that hard, it is actually possible to drive the speaker with twice as much power as the amplifier can cleanly produce into the speaker. As you can see below, the yellow sine wave is the maximum 'clean' output that the amp can produce. When an amplifier is pushed way too hard, the signal will eventually look like the white line. The effective voltage of the white line is ~1.414 x the yellow line. This means the total power driven into the speaker by the clipped (square wave) signal is double the power delivered by the 'clean' signal (yellow line). This means that the power is double but the cooling of the voice coil will not increase in proportion with the power increase (since the voice coil isn't moving as much as it needs to be for the given power dissipation). This will lead to the voice coil overheating. If we compared the output of a 100 watt amp (the one that's clipping) to a 200 watt amp, the 200 watt amplifier would be able to push the speaker as much as 40% farther than the 100 watt amp (depending on the frequency of the signal). This extra travel (in each direction from its point of rest) would result in added airflow around the voice coil.
Click on images to enlarge​
Note: The RMS voltage of a pure sine wave is equal to the peak voltage multiplied by 0.707. The RMS voltage of a pure square wave it equal to the peak voltage. For 2 waveforms with equal amplitude (as shown above), the RMS voltage of the square wave is 1.414 times the voltage of the sine wave. If we use the example of the 100 watt amp which can produce a sine wave of 20 volts RMS, we can see that the output power at hard clipping is double the power it can produce cleanly.
What is distortion?


http://
Spoiler [+]
Well, to get a little more complicated, distortion is any departure from a true and accurate reproduction of the original waveform. It can include Noise, Clipping Distortion, Harmonic, and Intermodulation Distortion. These last two forms are fairly common in loudspeaker reproduction and can be reduced but not entirely eliminated in the existing technology. It would be fair to say that modern amplifier design fairly eliminates nearly all forms of inherent perceived distortion, leaving only that caused by inappropriate user settings and overloading.

Distortion is the name given to anything that alters a pure input signal in any way other than changing its size. The most common forms of distortion are unwanted components or artifacts added to the original signal, including random and hum-related noise. Distortion measures a system's linearity - or nonlinearity. Anything unwanted added to the input signal changes its shape (skews, flattens, spikes, alters symmetry or asymmetry). A spectral analysis of the output shows these unwanted components. If a circuit is perfect, it does not add distortion of any kind. The spectrum of the output shows only the original signal - nothing else - no added components, no added noise - nothing but the original signal.

It's rather amusing to see amplifier manufacturers making great claims about the advantage of the extra .001 % Distortion they've wrung out of their products, while most speakers are considered very good if they can keep such distortions below 5 %. It's true that the reduction of any distortion anywhere is a positive contribution to the goal of high fidelity, but the disparity between the two technologies in this regard points up the largely subjective nature of many such claimed advantages.

Here are some of the definitions:
How much power can my new speakers handle?


http://http://
Spoiler [+]
http://
If you've read the FAQ above you'll already know that you're better off with too much power than not enough. That's no to say however that speakers cannot be damaged by too much power; they can!

All speakers have a rated power handling level and this comes in handy as a rough guide to know how much power to feed your speakers. A speaker's general power rating tells you how much A.C. power can be dissipated in the speaker's voice coil without damaging the speaker. The realistic way to rate a speaker is to give the rating as continuous RMS watts. Many speakers are advertised as "150watt" or "100watt" speakers and you may be forgiven for thinking that the 150watt speakers are better and will play louder than the speakers rated at 100watts. The first thing you should realise is that speaker ratings are often exaggerated for marketing reasons. Check to see if the rating is in RMS or peak watts and are the speaker ratings for maximum or continuous power. Most car audio speakers (with the exception of some subwoofers) are rated in peak power or music power. Only a few speakers (generally the higher quality speakers) are rated in RMS watts. While peak power is a legitimate way to rate speakers (as long as the manufacturer tells you that the power rating is in peak watts), it can be deceptive.

When talking peak vs RMS, you know that peak power is 2*RMS power. If a speaker is actually capable of handling 150 watts of peak power it would only be rated to handle 75 watts RMS. If a speaker is rated to handle 150 watts 'music power' it may mean that the speaker will take only very short bursts of power approaching 150 watts RMS. Even if there are two speakers from different manufacturers which have the same power ratings, one of the manufacturers may be more conservative in their ratings than the other manufacturer. The more conservatively rated speaker would be more likely to handle its rated power. The bottom line is beware of power ratings on speakers. Knowing that some manufacturers are somewhat optimistic with their power ratings will help you to make better decisions when buying speakers.

A quick word on amplifiers and speakers. Many people ask us "Can my speakers handle this amplifier or will this amplifier blow my speakers?" The simple answer is that any speaker can be driven by any amplifier. The only time that issues arise is when the person operating the system becomes careless. Sadly most people drive their amplifiers well into clipping. See above for explanations on clipping.


http://
http://

http://

http://


http://

Do I need the biggest amp possible?


http://


http://

How loud will my speakers play?


http://


http://http://

http://


What brand of amplifier would you recommend?


http://http://


http://http://


What is the optimum enclosure for my new subwoofer?


http://
Spoiler [+]
http://
Most subwoofers come with recommended enclosure volumes in the owner's manuals. More often than not this enclosure volume is safe allowing for the most 'home user error'. Specialized shops however use complete manual's and specialised computer programs to carefully design enclosures for specific applications based on the subwoofers paramters. The following is a very basic crash course on box types (this topic gets very in depth).

Sealed
Basically as far as sealed is concerned, the relationship between the characterisitics of the speaker being used and the volume of air inside the enclosure dictates the how well the sub will sound. When the enclosure is bigger, the air spring limits cone motion less and allows the system to play lower and with flatter overall response (lower Qtc) at the expense of power handling. Problem is if you go too large you start to compromise efficiency in order to gain the additional low frequency extension. On the other hand, making the enclosure smaller will cause the air spring to exert more control and limits cone motion at low frequencies which increases power handling but does not let the system play as low and produces a more peaked response (higher Qtc). For most half decent speakers there is a range of enclosure volumes that will produce high quality sound. Changing the enclosure volume within that range can fine-tune the sound to best suit the tastes of the listener. Of course other factors effect this but this is close enough.

Ported
Depending on the sound you desire, you tune a port to a certain frequency to achieve better bass response around that frequency. The tuning of the port there must be done using careful calculations which take into consideration the enclosure volume, the resonance of the port and the Thiele / Small parameters of the sub into consideration. Using these we attempt to delay the rear output wave of the speaker just enough so that when it comes out of the port it is close to being in phase with the wave being produced by the front of the sub. So with that in mind, you can see how, by altering the port length and diamter, we tuned the port to a certain frequency. The reason ported enclosures are generally considered louder is that when we utilise the work of the rear of the cone we gain double the bass, or 3dB over a broad range of frequencies. Again there are other things to consider and explain like the sub unloading below the port tuning but that is another thing...

Bandpass
With bandpass enclosures the woofer no longer plays directly into the listening area. Instead the entire output of the subwoofer system is produced through the port or series of ports. In a conventional sealed or ported enclosure the low-frequency extension is controlled by the interaction of the speaker and the enclosure design but the high frequency response is a result of the speaker's natural frequency response capability unless limited by a crossover. In a bandpass enclosure the front of the speaker fires into a chamber which is tuned by a port. This ported front chamber acts as a low-pass filter which acoustically limits the high frequency response of the subwoofer system. The name "bandpass" is really pretty descriptive in that it refers to the fact that the enclosure will only allow a certain frequency "band" to "pass" into the listening environment.

Obviouly the same thing be accomplished by placing a low pass crossover on the subwoofer system but a bandpass enclosure can produce significant performance benefits in terms of efficiency and/or deep bass extension that would not be possible in conventional designs of equal size. By adjusting the volumes of the front and rear chambers and the tuning of the port or ports, significant performance trade-offs can be created. When box parameters are adjusted for a narrower bandwidth the efficiency of the subwoofer system within that bandwidth increases and can reach gains of up to 8dB and sometimes even higher. As box parameters are adjusted for wider bandwidths, very impressive low-frequency extension can be produced from extremely compact enclosures at the expense of efficiency and good transient response. Intermediate bandwidths can also be designed which create a compromise between all these characteristics. As if that is not confusing enough, within each bandwidth range the designer can also manipulate box parameters to shift the range of operation up or down the sub-bass range which also has an effect on efficiency. As you can see, bandpass enclosures can have very different sound characteristics based on the designer's choice of box parameters. As such, it is not always possible to make blanket statements as to the performance benefits and drawbacks of bandpass enclosures in general.

One characteristic of bandpass enclosures which is universal is that they exert greater control over cone motion over a wider frequency band than conventional designs. Due to controlled, rapidly changing air pressure on either side of the woofer, the woofer is capable of producing high levels of acoustic output without physically moving very much. This means that the woofer is less likely to encounter excursion limits in the main part of the sub-bass range. However, just because the cone isn't moving as much doesn't mean that the speaker's motor assembly isn't still trying to drive the cone hard; it just means that the speaker cone is encountering resistance to motion. This resistance can be very hard on speakers, especially when SPL heads are playing their music. The conflict between the force generated by the motor assembly and the air pressure in the enclosure can impose extreme stress on the glue joints and suspensions of the woofers. You can literally tear a speaker apart in a bandpass enclosure if you apply too much power. Because the speaker is not moving as much and because noises are masked by the front chamber, it is also very difficult to hear when a woofer is in serious trouble. Many people have been known to crank bandpass enclosures up and blow the speaker to bits within a few minutes because they did not realize that the speaker was dying a horrible death. Choosing the right amount of power and carefully setting amplifier gains is very important in order to ensure long term reliability.

Bandpass enclosures can be divided into two basic types; single and dual reflex. In a single reflex design, the rear chamber is sealed and the front chamber is ported. In a dual reflex design, both front and rear chambers are ported into the listening area. A variation of the dual reflex and single reflex, known as "series-tuned," has a port which connects the rear and front chambers. The differences between single reflex and dual reflex bandpasses are similar to the differences between sealed and ported enclosures. A single reflex typically exhibits a shallower low-frequency roll off rate (e.g. 12dB/octave) and better transient response. A dual reflex is more efficient and controls cone motion over a wider range but typically has a sharper (e.g 18-24dB/octave) low frequency roll off. Because of the difference in low-frequency roll off rates, a dual reflex usually has to be larger in size to produce the same low frequency extension as a single reflex design.

Compared to more conventional enclosure designs, bandpass enclosures are very complex to design and build. The rules governing the performance of bandpass enclosures leave no room for error. Slight volume miscalculations or sloppy construction can turn a good design into a poor performing box. Integrating the proper size port or ports can be extremely challenging and often renders designs that looked great on paper completely impractical. The design of these boxes should definitely be left to people with extensive enclosure building experience.
http://


What crossover frequency should I use between my subwoofer and my6" or 5" midbass drivers?


http://http://


Should I use an active crossover or a passive crossover?


http://


Where should I place my tweeters for best performance?


http://http://
Spoiler [+]

http://
Okay, stop and think about a concert for a second. You don't sit with your back towards the band right? Rather, you want the sound in front of you. Likewise you want to be in the first row, be dead center of the band on stage and depending on your personal preference you might like to be slightly below the sound (as is an audience member) or slightly above the sound (as a conductor is). This is the image we try and capture inside cars today and tweeter positioning plays a large role in achieving this phenomenon. You cannot just simply slap tweeters in anywhere. To get a decent stage you need good width, height and depth - preferably mirror-tip to mirror-tip, floor to roof and as far down the bonnet as possible.

Where to mount them then? Kick panels, sails or elsewhere?
We often see tweeters mounted up high on the sail area on the door or down in the kick panels. Both these work well but can suffer from similar issues. The problem with the sail mounts is this; think about the position of your ears in relation to the tweeters. One speaker is belting the high pitch tunes out about one foot from your ear where as the other tweeter is triple, quadruple or quintuple that distance away. The image has no choice but to be right out the side window. Sheer laws of physics govern this fact.

If you place the tweeters down in the kick panels then the right speaker distance is about three feet and the left speaker is about four feet away. The problem is not utterly eradicated but it becomes a lot less noticeable as the distance separation is reduced (by up to half sometimes). However using the kick panel method can result in the stage being a tad low (the kicks are often used on cars with no factory tweeter location to avoid the cost of custom A-pillars or sails too). Remember tweeters cannot be placed anywhere where they fire straight into ones feet so you have to be more careful about their placement on both sides and more often than not this results in them being mounted very high up in the kick panel, quite often well out of sight and well up under the dash - this is also good for security too.

The final mounting place of your tweeters depends what you desire from your system and what your budget is. As mentioned above; when choosing a tweeter mount in order to achieve a great sound stage you're always faced with various issues. Put the tweeters up high and forward and you'll get good depth and height but the stage width can sometimes suffer. If you put them deep in the kick panels you tend to get good width and depth but the height can sometimes suffer. Seems you cannot win sometimes, especially when you factor other things on like reflection issues. Generally speaking though, mounting the tweeters in the a-pillars right at the front corner of the dash will result in the best unmanipulated (i.e. no time alignment) sound stage. If that is not an option, then experimentation is the best strategy. Remember too that tweeter location can also play a role in ambience too. If the tweeters are positioned correctly (whether in the kick panels, A-pillars or even behind the review mirrors) they will help the whole component set fill the car with high frequency sound - not just way off in front of you.

There are two other issues to consider when choosing where your tweeters will go too. Cost is one because to mount the tweeters successfully in the A-pillars there is a good chance you're going to require some custom work done and hence the price goes up. Then there is also the security issue too because people can now see your tweeters. Factor all these issues in when you are deciding.

What about time alignment?
Time alignment is an essential tool but it can also be a curse if not used correctly. One of the more common problems associated with time alignment is regarding the seperate sides of the car in relation to stage width. If you're not careful, the better you make one side sound (and you can get it absolutely perfect) the more the other will suffer. This is because you're delaying one speaker side so both signal paths reach your ears at the same time. The problem with this is that the other side has the reverse problem to your side so as yours gets better, it can get worse. However when used correctly (and we recommend you do use time alignment) it can move the stage depth forwards (you delay the fronts in relation to the subwoofer too) in addition to getting your image perfectly located in the center. With a careful blend of experimentation and measuring you will eventually get both sides sounding great.

So how does one get the stage right in real world terms?
At the end of the day you'll just have to experiment quite a bit (and sometimes it can take days) to get the tweeter placement just right to achieve the perfect stage 'width', 'height' and 'depth'. Get yourself a nice big blob of blue-tac. Stick the tweeter onto a panel somewhere, turn the time alignment off for the moment and commence playing songs performed by a powerful vocalist (ranging from baritone up to contralto as these are the frequencies at which human hearing is most sensitive and therefore is best for staging). Close your eyes and imagine you're at the concert. Now listen to where the singer is coming from. Are they singing from right in front of you? Are they slightly off to the left a tad or right? Are they a little high or a little low? Simple move the tweeter a few inches in a direction and have another listen. How is the image? Can you hear where all the band members are exactly? How is the depth? Does the drummer sound like he is behind the other musicians (stage depth)? Do the individual musicians sound like they are specifically somewhere on the stage? (stage width). Keep doing this until you get the image dead center but remember to take a rest every fifteen minutes for half an hour to let your ears normalize. Remember your ear drums are controlled by muscles and they (just like any other muscle) get tired, so make sure you give them a rest. If you attempt staging for hours on end your ears tend to 'hallucinate' and give false readings. Once you have it very close then you can activate your time alignment and do the fine tuning.

Advanced staging and imaging techniques
If you're really serious about getting your stage and image the best it can possibly be then you should also consider the manufacture of new panels altogether. That way you can physically change the location of the tweeter (in the case of a two way component set) or midrange and tweeter (in the case of a three way component set). Below are some of the options for different tweeter and midrange mounting locations.
Click on images to enlarge​

http://


I've heard people recommend against 6x9's. What are thepros and cons?


http://http://
Spoiler [+]

http://
It seems there are few debates in the known world larger than the one concerning the humble 6x9" speaker. Now depending on which side you're on (as there seems to be no middle ground these days), 6x9's are either a little nuisance that you'd rather have sitting far in the rear of the car or better still, on the road behind the car, or you cannot even contemplate a life without them.

Lets begin with some basics. 6x9's are oval shaped speakers aptly named because they measure 6 inches by 9 inches. There are slightly different versions measuring 7x10, 4x6 and 6x8 on the market but let us concentrate on the daddy of the group. 6x9's are more often than not three or four way drivers (that is; three or four speakers in one unit) and comprise of a 6x9 woofer, smaller mid-bass (or two) woofer and a tweeter mounted on a bridge over the main woofer. They are commonplace in many different factory audio systems right over the world.

But I have heard so many conflicting opinions…
Now you might have heard hi-fi buffs recommending against using 6x9's in high end audio systems whilst recommending them for every other type of system. There are actually numerous pro's and con's of 6x9's and there are reasons why they're avoided for high budget systems and targeted for low budget systems and factory upgrades.

Lets look at the cons first.
The first issue is the actual cone size. The large woofer cone is a different width to length so it is obviously uneven. When viewed under a microscope the woofer cone can physically distort quite dramatically and hence, disastrously so far as sound quality is concerned. They tend to distort more than round or square speakers where kinetic forces are evenly exerted across the cone surface. Another big problem faced by 6x9's is one similarly faced by co-axials. The woofer is seated directly underneath the midrange and tweeter. While this doesn't bother the average tweeter because they're sealed in most cases, it can cause great stress and problems for the midrange which is trying to play a higher frequency than the pounding a woofer underneath. More often than not midrange clarity tends to suffer and can sound blurred as the woofer underneath wins every time. Simply put, 6x9s are not dedicated drivers. They do not offer the same freedom for fine tuning nor do they faithfully reproduce sound like separate components do. They do their job competently but will never match a separate subwoofer for bass reproduction, or separate woofer for mid-bass reproduction or tweeter for high end reproduction because these drivers are dedicated to reproducing their own little part of the sound spectrum and they do it well. Components can also be mounted separately to help with staging and imaging.

But they must have some pro's.
They do. As stated above the cone on a 6x9 is exactly that, which incidentally is nearly the same surface area as an 8" subwoofer. With their relatively high power handling, the 6x9 can punch out quite a bit of bass and they can even be run in enclosures to enhance this ability. Another big bonus of the 6x9 is their power handling ability and efficiency. They can be run off the smallest internal (head unit) amplifier to the largest external units. Because of this ability they make terrific upgrades to factory systems where a little more bass is required. On that note, they will also fit into many factory locations without the need to cut anything up.

Expense. Time. Space. Money. Say it how you will, 6x9's are a hell of a lot cheaper than lashing out on a large external amplifier, sub enclosure, subwoofer and splits. And they will take up a lot less room too incidentally. At the end of the day 6x9's make an excellent addition to budget systems and make terrific factory upgrades because they do a little of everything quite acceptably. They are very good drivers for beginners and people looking for a little more of everything but lets be realistic, they won't keep the staunch audio buffs satisfied for long.
http://


When I turn my music up, my headlights dim. How come?


http://http://
http://http://


How do I tell if my speakers are in or out of phase?


http://http://


How do I use my faders and balance settings to make my systemsound better?


http://http://


What are the different amplifier classes all about?


http://http://
Spoiler [+]

http://
All sound is a sinosoidial waveform in that it has alternating peaks and valleys. The center point of each wave is the zero, or switching point that separates the positive (top) from the negative (bottom) portion of each wave.

When a tube or transistor amplifier operates in Class A, the output tubes or transistors amplify the entire waveform without splitting it into positive and negative halves. Class A amps usually provide lower, often imperceptable distortion, but at the expense of reduced power output.

In Class AB, used in the overwhelming majority of amplifier designs, the signal is split into two halves, positive and negative, and each half is sent to a tube or transistor circuit for amplification. Both sides work in tandem, and the two halves are recombined at the output section to reconstruct the whole signal. This technique increases the amount of power that can be applied, but increases distortion.

Class D or High Current operation is essentially rapid switching, hence the term switching power amplifier. Here the output devices are rapidly switched on and off at least twice for each cycle. Theoretically, since the output devices are either completely on or completely off they do not dissipate any power. If a device is on there is a large amount of current flowing through it, but all the voltage is across the load, so the power dissipated by the device is zero; and when the device is off, the voltage is large, but the current is zero. Consequently, class D operation (often, but not always digital) is theoretically 100% efficient, but this requires zero on-impedance switches with infinitely fast switching times -- a product yet to be made; meanwhile designs do exist with efficiencies approaching 90%. Class D design is increasingly popular for driving subwoofers, where maximum power is necessary, and slightly elevated levels of distortion are easily tolerated.


http://

http://
http://http://


What amplifier specs should I look out for?


http://
Spoiler [+]
http://
Choosing an amplifier is about more than just watts. When speaking to anyone about achieving quality music in car audio most people simply focus on the speakers rather than the amplifier. They often speak about speaker build quality and power handling, enclosures, porting, fibrefill, loading and speaker cable. You don't really need to worry about the amplifier so long as it's powerful enough right? Just like when you're considering the purchase of a new car; the only thing you need to look at is the power output of the car alone right? Wrong.

When choosing an amplifier to power your speakers there are more stats than just power output you need to think about before you splash a couple of grand on an amp that will sound like rubbish. For those among you dreading an upcoming lecture on amplifier classes, resistors, capacitors, transistors, transformers and power supplies relax, I'll keep this to plain English for the explanation of which stats to look out for. High power output is important but quality amplifiers are not just about sheer power. Mining dump trucks have over 6000 horsepower but that doesn't make them spectacular performers. Besides power there are certain other important figures that must be taken into consideration when choosing a suitable amplifier. We'll go through a few of the more commonly found stats.

Damping Factor
Damping factor describes an amplifiers ability to control a woofer cone. It's the ratio of rated load impedance to the internal impedance of an amplifier. The higher the damping factor the more efficiently an amplifier can control unwanted movement of the speaker coil. High damping factor is crucial for subwoofers and the higher the damping factor the better. It is debatable if anything over 50 is audible. Damping factor is calculated by dividing the speaker impedance by the output impedance of the amplifier. In other words the damping factor will decrease as the speakers impedance decreases. This means an amp optimised at 4 ohms will provide tighter bass than when they're running at 2 ohms. A lower damping factor will leave bass notes sounding soft and undefined, regardless of the amplifiers power output. You can see by this that a smaller 100 watt amplifier with a high damping factor can often sound better than one twice it's size with a low damping factor.

Slew Rate
Sometimes referred to as damping factor for tweeters, the slew rate describes the amplifiers ability to accurately control fast direction changes of a speaker cone or dome. Have you even turned your stereo up to discover that your cymbals sound like someone throwing a brick through a glass window? That's because the amplifier simply wasn't fast enough to accurately reproduce the high frequency ring of the symbols. Measured in volts per microsecond, a low slew rate softens the definition of a sound signal which blurs transients and causes the sound to appear muddy. A high slew rate means the amp responses faster which ultimately results in crystal clear highs.

Total harmonic distortion
THD is the measurement of the how much the amplifier can distort the sound signal through the introduction of added harmonics or overtones. THD figures are usually given as percentages and a THD figure below 1% are generally inaudible to most people. However, distortion is a cumulative phenomenon so if your head unit, eq, crossover and amplifier are all rated at less than 1%THD each, together they could produce 5%THD which may well be noticeable to most of you.

Signal to noise ratio
Noise leaking into the sound signal is an ever present problem in car audio. The Signal to noise ratio is a measurement of noise level in the amplifier compared to the level of the signal. A higher S/N ratio signifies a greater difference which is better. Technically speaking, it's the ratio expressed in dB of signal power at a reference point in a circuit to the noise information that would exist if the signal were removed (the noise floor). The maximum signal to noise ratio of the amp can be seen as a measure of realistic fidelity. This ratio is how much absolute noise it produces compared to the highest signal voltage it can pass without distortion. Many companies combat noise by utilising balanced line systems.

Stereo separation.
Separation is not spoken about much but this refers to the amplifiers ability to maintain the separation between the right and left channels. This is essentially what allows an amplifier to reproduce an accurate sound stage. Each individual instrument is after all, are recorded in it's own location in the sound stage and you should be able to hear this in the same way when it's played in your car.

Just a final few points to remember while you're looking at specs. You'll find many are followed by the term 'A weighted'. Put very simply, 'weighting' is part of a compensation system that accounts for various factors (for example, one such factor is the human ears' natural hearing curve). However; sadly some companies are guilty of using this weighting to make its amplifiers figures appear more attractive. Loading is another issue to consider. Watch the impedance of speakers when choosing them because while most amps are stable at low impedance levels, they're not overly efficient nor performing 100% when loaded down. Your cars engine is 8000rpm stable but it's unwise to try and keep it there for long. By the same token many amps are 2 and 1 ohm stable but this is for intermittent spikes (as music is dynamic it causes the speakers resistance to continuously change during playback), not continous everyday running.

These are some of the more important figures to observe when buying amplifiers. It's not simply just a matter of buying which ever amp outputs the most power. It's a matter of taking all the figures into consideration and choosing which amplifier best suits your needs.
http://


Can you simply explain Ohms and resistance?


http://http://
Spoiler [+]

http://
Well lets see? Put simply, Ohms is the measurement of electrical resistance and system impedance. It is a measure of the degree to which electrons are limited in both velocity and quantity in passing through a circuit. In Impedance measurements, this takes into account, the mechanical resistance inherent in the motion of transducers. The standard is usually 4 ohms for car audio and 8 ohms for home and commercial audio. Some specialty woofers may be rated at 2, 6, 12 or even 16 ohms. You would have seen the 12 ohm JL's before no doubt.

Ohm's Law is the he mathematical relationship between voltage, current, and resistance. It is named after George Ohm, it's discoverer. Ohm's law states that current volume in a conductor is directly proportional to the voltage flow across it and inversely proportional to its resistance (assuming the temp remains constant). In general, this means that more voltage will produce more current, if resistance stays the same, but higher resistance will cause current to decrease if voltage stays the same. In mathmatical terms, V = I x R, where V is voltage, I is current, and R is resistance. Ohm's law is a description of electron behavior upon which virtually all understanding of electronics is based.

Just for further background information, you might have heard all this called resistance of impedance so I'll give you a little more info on those two things as well.

Regarding resistance, almost all conductors of electrons exhibit a property called resistance. Resistance impedes the flow of current. It is measured in units called Ohms. With a water hose, resistance could be regarded as friction between the water and the hose. A larger hose would create less friction and have a lower resistance than a smaller hose. It could also be a finger over the hose end. In electrical circuits, small round cylinders with wires on either end are called resistors. These typically reduce the flow of electrons to serve the specific requirements of the circuit elements, such as amplification or switching functions.

Finally, Impedance. The totality measured in Ohms of all electrical opposition to current flow: resistance, reactance, capacitance, as well as all mechanical factors inhibiting the completion of energy transfer in a contained system. In practical terms, this means that most Drivers are assigned a certain nominal impedance based on their DC voice coil resistance and mechanical stiffness. For car audio this is usually 4 ohms; for home stereo, 8 ohms is the standard. Put simply, your voice coil has a certain amount of copper winds in the voice coil(s). If you want a high resistance, triple the amount of winds and the current suddenly has to do X amount more work to travel past the coil.


http://


How do I set my gains?


http://http://
Spoiler [+]

http://
Contrary to popular belief, the amplifier gain control is not simply a volume knob that determines the maximum volume that an amplifier can produce. As long as the head units signal (which runs down the RCA cords) has sufficient power the amplifier is able to produce its maximum power output level. It's a matter of getting the full volume range of the head unit to match the full output range of the amplifier(s). The gain controls do exactly that. They are also used to match other amplifiers in the system (in the case of a multi-amp system). Not all head units have the same maximum preamp output voltage. Some head units are capable of producing 9 volts on their preouts while others are only capable of 1.5 volts.

Please note that most head units will reach their maximum output level (and begin clipping - see above) just before the volume control reaches the upper end of its range (usually at a point of 85-90% of its maximum range).

Assuming your amplifier is the right power for the speakers (around the same as their rating), the proceedure of setting the gains is not overly difficult. First you set everything onto zero. All amplifier gains should be turned right down and all head unit boosters (like the loudness button) should be off. Then turn your deck up full volume and then back it off to about 85-90% (eg if your Alpine deck goes to 35, bring it up and then back off to 33-34). Moving to the amplifier, slowly bring the gain up until the distorting becomes audible. Once it's audible, turn it back ever so slightly and that is your gain set for that amp.

Now remember if your amplifier output is much higher than your speakers rating (e.g. running 50 watt speakers with a 500 watt amplifier) the amp will destroy the speakers long before it begins to distort at all. For this reason we strongly recommend that unless you're a pro, you purchase the correct size power amplifier for your speakers. If you do have a larger amplifier for superior control then you will need to get a pro to set the gains. It can be difficult to set the gains when there is more power available than the speakers can handle.

In plain English, what you're doing is insuring the entire volume range of the head unit (e.g. 0-35 on Alpine head units) matches the entire volume range of the amplifier. In multiple gain / mulitple amplifier situations, we usually recommend setting the midrange amplifier first as it is easiest to hear distortion through midranges (human ears are most sensitive to 1000-2000hz).
http://


Do I really need sound deadening?


http://http://
Spoiler [+]

http://
Ever visited a cinema with no carpet on the walls? Ever wondered why most home theatre walls have curtains? Maybe you've seen a car or jet test cell without diffusers on the walls? What about a radio studio or sound recording booth without diffusers? No? Starting to notice a pattern? Sound deadening and diffusers are fundamental cornerstones (and arguably one of the most important aspects) of any sound system. They're so important in fact, that they should be budgeted for long before the speakers themselves are. However before we delve into the wonderful world of what sound deadening and diffusers actually do, let's first take a step back and look at what sound actually is.

Simply put; sound is differing frequencies of pressure waves. Expanding that concept a little; when sound is created in a medium (i.e. it cannot travel through a vacuum) it's in the form of a mechanical wave. This wave is the result of back and forth vibration of the particles that make up this medium. As sound waves move through air the particles are displaced both right and left as the energy of the sound wave passes through it. The motion of these particles is parallel to the direction of the energy origin and this phenomenon is why we characterize sound waves in air as longitudinal waves. A speaker cone is designed to create such a longitudinal wave. As the cone moves back and forth it pushes on neighbouring air particles. The forward motion of the cone pushes air molecules horizontally to the left while the backward retraction of the cone creates a low pressure area allowing the air particles to move back to the right. This movement creates regions in the air where the air particles are compressed together and other regions where the air particles are spread apart. The high pressure regions are known as compressions and the low pressure regions are known as rarefactions (note; not refractions - that's to do with light waves).

Wavelength (also known as path length or soundwave length) are common terms when talking speakers and physical sound. Wavelength is the distance the aforementioned disturbance travels along the medium in one complete wave cycle. However at this stage there is a small differentiating factor that should be explained and that's the difference between transverse and longitudinal waves. For traverse waves this pattern occurs once every wave cycle and is commonly measured from one wave peak to the next adjacent wave peak (or from one wave valley to the next adjacent wave valley). Since longitudinal waves do not contain peaks and troughs, their wavelengths must be measured differently. A longitudinal wave consists of a repeating pattern of compressions and rarefactions. Therefore the wavelength is commonly measured as the distance from one compression to the next adjacent compression or the distance from one rarefaction to the next adjacent rarefaction.
Click on images to enlarge​
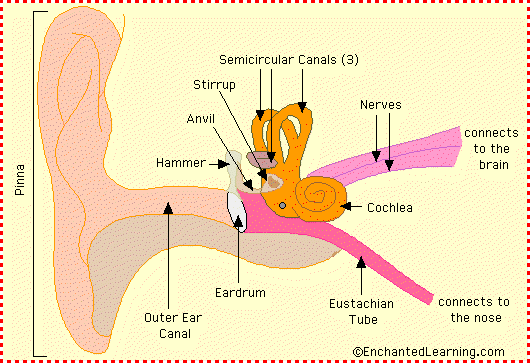
When speakers move backwards and forwards they do so many times a second. Each time the cone does one complete movement forward then backwards then back to the zero point it's known as a cycle or one hertz (a.k.a. 1Hz). If the speaker undertakes one thousand of these cycles per second it is known to be playing 1000 hertz or 1 kilohertz (a.k.a. 1000Hz or 1kHz respectively). Music is the repeating pattern of these high and low pressure regions in various frequency orders and certain patterns of frequencies our ears interpret as harmonious. This harmony is simply the music you're listening too. The Pinna (the outer ear skin section) catches these waves and directs them into our ear canal which houses our ear drum. The ear drum then mimics these varying pressure waves and lets your brain know what its hearing.

Now you understand the basics of how sound physically works so let us move to the sound deadening itself. As speakers move in alternating directions the sound emanates from both the front and rear of the cone. The front wave is heard by you while the rear wave is what the sound deadening and diffusers deals with. With all due respect; your cars doors are glorified metal cans. They echo and reverberate inside and the skins flex easily, causing bass to become blurred and muddy and even to cancel itself out all together. I usually explain it by using the following analogy. Imagine you're seated in a boat in the middle of a crystal clear flat lake. One hundred meters away there is another boat floating idle. If you start gently rocking you boat, waves emanate from it. Pretty soon these waves reach the second boat and it also begins bobbing to mimic these waves. The problem is that as this second boat rocks it not only reflects your waves back but also creates its own. Your doors are the same in that the metal skins flex and create all matter of sound effects. These waves are only minutes or seconds out of phase (i.e. not even whole degrees) to the active wave and the result is that your ears get bombarded by literally hundreds of sound waves that are not supposed to be there. This creates an echoic effect and the end result is that the music sounds hollow and tinny. By adding sound deadening you're adding mass to the doors skins (like swapping the second boat for a cement pier in our analogy). This combats flexing its effects on internal sound waves.
dynaxorb_with_without.gif
Diffusers are absorbent pads that resemble foam or tiny egg cartons. These fight wave reflections and are placed directly behind the speaker. Remembering back to our boat analogy with the cement pier (deadening) now in place; while extra waves are not being created any more, the main waves will still be reflected. This is where the diffusers come in. We know from above that sound waves have a certain lengths at any given frequency. Somewhere within these frequencies is the perfect distance for sound emanating from the rear of the speaker cone to travel to the doors outer skin. This will then reflect and come flying back to impact the cone and cancel the next cycle. The diffusers catch these sound waves and trap them much the same way that the paint on stealth aircraft catches radar waves or submarines rubber skin traps sonar waves. The reason you need diffusers on top of the deadening is that most sound deadening has a smooth skin and hence still reflects sound waves.

Another vitally important aspect of achieving good midbass is to seal the speaker into the door. In nature all elements take the easiest path from origin to destination. Water is a good example of this phenomenon; you pour it out and it will run wherever the easiest path is. Air is the same. When your speaker cone moves forward, it creates a high pressure cell right in front of the speaker cone. If there is a high pressure cell in front of the cone then there will be a low pressure cell on the rear side of the speaker cone. If the door is fully sound deadened and the speaker is sealed on using sealant of foam gasket, the high pressure air will move out towards you with the end result being incredibly punchy and tight midbass from your doors. If there is no sealing (say the speaker is simply screwed down to the metal) and contains air leaks everywhere, the high pressure air simply takes the easiest path and moves around the edge of the speaker frame to behind the speaker where the low pressure cell is. In simple terms, you get no bass.

Many cars come with deadening from the factory but it is usually an insufficient amount, often only being a few inches here and there to minimise rattles during transit. Car manufacturers limit this deadening in order to keep production costs down. How much deadening you end up installing depends on your budget but both the inner and outer skin of your front doors should be fully deadened at least. You can always add more to the boot, floor and roof down the track.

In conclusion; for the serious sound enthusiast sound deadening is an absolute must. If you have a close look you'll notice the cars that sound the best in every continent (especially the ones that win the sound offs) are chock full of deadening. Sound deadening even helps factory speakers so get your self some today.
http://


Should I upgrade the speakers in the rear of my car?


http://http://
Spoiler [+]

http://
Think about a concert, opera or other similar performance; you don't sit with your back to the band or performance do you? It's the same for your car audio system; seeing as you're seated at the front of the car and your ears face forwards we recommend you leave the rear speakers factory and not bother to upgrade them. Instead, concentrate on the front speakers. The only time we bother upgrading the rear speakers is if you either:
The reason is this; the Pinna (also called the auricle) is the visible part of the outer ear. It collects pressure waves (differing frequencies of pressure that we interpret as music / sounds) that the membrane captures from in front of it and directs this sound into the outer ear canal. It's important to remember too that each pinna individually is responsible for determining height while the two ears together determine width. Sound coming from being the pinna, unless the frequency or volume fluctuations are significant, will not be accurately collected accurately.
Hence the upgrading of the rear speakers will not present you with much benefit. This is why we have front 'stage' and rear 'fill'. One thing to note though on the subject of rear fill is that this all comes down to personal preference. Some people actually like the sound emanating from behind them so if this describes you then by all means upgrade the rear speakers.
Click on images to enlarge​
From what you have read above you can now see why many demo and competition cars have their rear speakers turned down or simply don't have them at all. What we instead recommend is that you spend all your money on the front speakers where you are and get yourself some sound deadening (q.v.).
http://


Do my subwoofers need separate chambers within their enclosure?


http://http://
Spoiler [+]

http://
When running more than one subwoofer in an enclosure, you'll need to decide between using a common chamber (where all subwoofers run in the same airspace) or a separate chamber enclosure (where each subwoofer has its own airspace). Common chamber enclosures have no dividers between the subwoofers and the airspace inside the box is the internal volume for one subwoofer multiplied by the number of subwoofers in the enclosure. Separate chamber enclosures are built in a way that sees every subwoofer isolated inside the enclsoure in its own chamber.

Generally speaking, it's usually better to have each subwoofer running in its own isolated enclosure, especially in a sealed box. We say this because if one of the subwoofers ceases working for any reason in a common chamber enclosure, it could cause the other subwoofer(s) to unload and you could end up ruining the subwoofers that are still working. For example, if your subwoofer can only handle a 0.88cf sealed enclosure and is running flat stick when it's brother dies, then all of a sudden that remaining subwoofer is in a 1.6cf sealed enclosure.

Ported and bandpass enclosures are the only type of enclosures that we tend to recommend running with a common chamber. This is because it allows you to have a single port (either slot, round or otherwise) acting as the port for all subwoofers in the box. This will generally require less space than having separate ports in separate chambers for each subwoofers. The possibility of a good subwoofer unloading when another fails is less likely in a ported box as well.

In conclusion; if you're running with a sealed box then we suggest it should have separate chambers for each subwoofer. If you're running a ported subwoofer enclosure then it is quite okay to have either separate or common chambered enclosure. However, if you have the space it is always best to design a multi-chambered enclsoure so each subwoofer is isolated in its own airspace.
http://


http://http://http://http://http://http://http://http://http://http://
 
old setup (sold) from other whip: rockford (2) T2-15s"Dual 2ohm subs, 4000.1bd amp, polk audio mids/hi's, 400.2punch amp, Pioneer Premier HU

now, in the hoopty: rockford 2500.1bd amp, (2) alpine type R 10"s, rockford 250.2 amp for Orion mids/hi's, Pioneer Premier HU

Future setup: RE SX 15", audioque amp (1500.1)? :i dunno yet. Prolly keep my mids/hi's, might change to an alpine HU.
 
Originally Posted by Jwill JR

yea I got the tools to build one ..


Good..you just saved yourself some coin
laugh.gif


Kenwood dnx6140 749.99
http://www.sonicelectroni...+DNX6140+-DNX-6140-.html

Morel Tempo 6 249.99
http://www.woofersetc.com...Way-Component-System.htm

Kenwood XR-4S 299.99 does 300x2 bridged.
http://www.woofersetc.com...h-300-Watt-Amplifier.htm

Sound Solutions audio Xcon 12" & Sundown 1500d
http://www.soundsolutions...SAZ%252d1500D-COMBO.html

Second skin sound deadening..pick up a shop pack 289.87
http://www.secondskinaudi...n-mat/damplifier-pro.php

Layer this stuff on the inner, and outer door panels..cover up all the holes with the deadening..

this will get more indepth
http://dynamat.com/downlo...etition_Door_Install.pdf

Your box will be 2.75 cu.ft. tuned to 30hz..Should mash the lows
pimp.gif


You can read about box building here
http://www.caraudio.com/forum/forumdisplay.php?f=25

and here
http://www.termpro.com/articles/buildbox.html
 
hey monday im gonna stay with the 2 sundown sa 12s like you said just gonna save up haha but are the sites soundsoloutionsaudio.com, sonicelectronix.com andonlinecarstereo.com cool to buy off of? and so do you have to have some of that sound deadening
 
Originally Posted by lebrady23

hey monday im gonna stay with the 2 sundown sa 12s like you said just gonna save up haha but are the sites soundsoloutionsaudio.com, sonicelectronix.com and onlinecarstereo.com cool to buy off of? and so do you have to have some of that sound deadening
Yes and Yes...
 
havent been in this thread in a good minute, homecoming week has that effect...
pimp.gif


but 2 12s in the max will do ya right
 
i'm back lol. Should I go with 2 10s or 1 12?

and are the component speakers really necessary or are the just optional?

Somebody told me they're just optional and I should just get tweeters
 
Originally Posted by That Kid Daniel

i'm back lol. Should I go with 2 10s or 1 12?

and are the component speakers really necessary or are the just optional?

Somebody told me they're just optional and I should just get tweeters
1 12
comps and sound deadening are a must

Trash
trash
and
trash
 
I'm running just tweeters off HU power and a 12" xplod in my sister's CR-V


For love of god get some decent comps
 
Back
Top Bottom