- 249
- 195
- Joined
- Mar 6, 2003
Yo NT... since the last guy that started the other post went MIA, I decided to start my own post. I am not taking any credit from him or his work...everyone was just complaining that dude was gone and not responding to IMs. Mods, if I am wrong, can you please move my post to the OLD Sneaker InspiredFurniture Post... please?
(since this is NT) CLIFFNOTES:
--Making a Nike box (toy box) for my son's bday. It will be his new toy box
--Step by Step intructions are in red text.
--Pics for those who just want to see and NOT read the instructions
--I am not finished w/ the box. Might not be for a few days - few weeks
--Updates will come as soon as I get the box finished
I've also had the idea of doing this, so I decided to make moves. My son's bday is in a few weeks and I want to buy him a puppy. he has a bunch oflittle toys here and there, so I had an idea to make him a toy box for his bday... and put the puppy inside of it as his gift. He'll be turning 3.
anyway, I didn't think it would be as time consuming as it has been. I am sure there are better, more efficient ways to make this box than I am about toexplain. This is my first one, so of course I will make mistakes. I am NOT a carpenter nor do I have background in this stuff. I am just doing this for fun.
First of all, I am only using one sheet of 4x8 plywood. I got the one thats already sanded because those extra few dollars saves a LOT ofwork later in the process. Basically I drew it out so I can get the most use of the whole sheet of plywood.
(when making your measurements, don't forget to include the 1/16 - 1/8 of an inch the cuts you make will take off. I learned that the hard way.)
I had the sheet cut at the store as soon as I bought it. that also helped me get the wood home. While at the store, I bought some gorilla glue. This stuff islegit. I would recommend you use this to help securing the wood (in addition to whatever you choose i.e. nails, wood screws, etc.) I also bought wood filler.I chose to have natural wood... and natually, it had flaws. I used the wood filler to fix those imperfections.
Next, I put the pieces together w/out securing them. Don't just start nailing away.
When all of that was done, I started gluing the pieces together. when using this glue, you should clamp the pieces together to make a more secure hold. Since Iam building this at my gparent's house, my gpa let me use his tools. He pretty much has every single tool in the world. You can see below that I used aclamp used for projects like this. I put pieces of cardboard folded in 1/2 so the tightening of the clamp wouldn't dent the wood. If you can't do that,plan the build so you can put something heavy on top of that piece of the box so you can use the weight of a heavy object to act as the clamp would.
The glue (found this out the hard way too) expands. You ca see this in the pictures. It REALLY sticks to the wood... so I would advise you to be careful withhow much glue you use. To take this excess off, I used a brand new, sharp wood chisel and a box cutter. For the excess on the OUTside of the box, I justgrinded/sanded it off. that was much easier and faster for me.
When the glue was dry, I put nails (i used 1-1/2 finishing nails) about ever 8-10 inches apart in both direction... meaning from the front and the side. Thiswill reinforce the box better. I used a similar technique to what drywallers use when installing drywall. I pushed the nail below the surface of the wood andfilled the hole w/ wood filler so you wouldn't see the nail when it was painted. (I tried to at least)
After it was all secure, the excess glue was removed, and the holes were filled w/ wood filler, I sanded the whole box with 180 grit paper to smooth it outbetter. I blew the excess dust off.... and finished it off with 220 grit. I used a compressor to blow off the dust again, but I found that using a clean papertowel or an old shirt gets stuff the didn't come off w/ the compressor. Here is the box all sanded right before I am about to paint it.
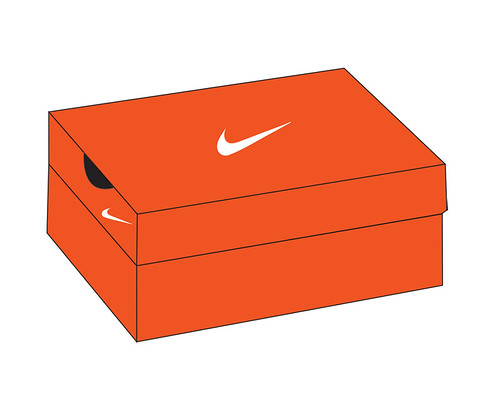
Now time for painting. Since the traditional nike box is orange (i think there have been 3 different oranges used in nike boxes) I chose the color I liked themost. You can get color samples from any paint store. The color I got was FLAME from Home Depot.
Here's the box painted 1 time. (it was dark when I finished, so the orange looks different (darker) than it was at this point.
Here's the box painted a 2nd time. Ignore the white spots. there's a tree in the background and the sun was going through)
I want to paint the box 1 more time.... but we'll see. It depends on how it looks after the 2nd one is dry. (I left after painting it the 2nd time.)
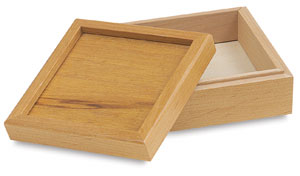
I still haven't decided how I want to do the lid of the box. I have playing w/ 2 or 3 different hinges for the back of the box that aren't so big andbulky. The only crappy thing is that the wood is heavy, so it wouldn't make sense to get some weak hinges that won't hold the wood or that will breakeasily. I still have a lot of work to do on it. I want to make it look like a real box, so the swoosh, the box tag, the lid... etc are still to come. I willkeep you guys updated as I get finished. I am busy at work and with my son, so I don't have that much time to finish it. I might not have updated pics fora few days, maybe a week.
let me know what you guys think. any ideas, suggestions, comments?
******************************************************************************************************
Update 10/13/09
******************************************************************************************************
So, I have been working on this box more than I thought I would. This thing is a lot harder (more time consuming) than I thought it would be. First, let me saythat I would NOT have been able to do this without a table saw and a brad nailer. It just makes the job so much easier and so much cleaner.
Well, I went to the hardware store to buy some more wood to so I can experiment with a few ideas. One of my buddies does car audio install.. custom boxes andthat kind of stuff. He suggested that I use a type of wood called MDF (medium density fibreboard.) Most people would recognize it if they have speaker boxesin their car. The wood is more dense than regular 4x8 sheets of plywood (not to mention heavier.) BUT, after the experience I had w/ it, I wouldn't use itagain. First, MDP does not take impact very well. When I would rest the wood on is edge, I would CONSTANTLY have to worry about whether or not it was going tochip/separate. Its like bending the edge of cardboard. Once you mess it up, there's no going back. You can clearly see any and all damage on the MDF wood.With regular plywood, you can be more careless w/ it and it'll still be ok to use.
Anyway, initially I used MDF to make the lid... but after all the nicks and dings the wood took, I got frustrated and said forget it. I decided to go buyanother piece of plywood. The plywood I'm using for the lid was the cheaper version of the wood I used for the actual box. The only difference (other than$1") is that the more expensive wood is pre-sanded. If I would have known that, I could have saved some money building the actual box. Oh well, lesson learned.
is that the more expensive wood is pre-sanded. If I would have known that, I could have saved some money building the actual box. Oh well, lesson learned.
So, I cut the lid using the table saw to match the messurements of the box. Unless you have precise tools that will almost guaranteeperfection, I recommened using the box itself instead of measuring. I placed a sheet of wood over the box itself and drew lines w/ my pencil as to where tocut. I measured the first time using the MDF wood and I messed up almost a full sheet of the wood. If you're off by millimeters, it wont fit. That was themost frustrating part.
Here's the lid. It has NOT been sanded nor filled in (i.e. the holes made by the brad nailer and the gaps on the inside of the box.)I was going to use a wood filler to fill in the gaps, but I figured I'd use silicone on the inside since its cheaper and it will serve as an adhesive forthe wood. I ran out of silicone last night, so I'll be finishing the rest tonight. I traced out all of the pieces for the lid and cut the appropriatecorners to 45 degrees. You can see how the pieces fit together in the later pictures.
Here's the inside of the lid. The white stuff is the silicone to fill in the gaps. I will eventually put it in all of the gaps on the inside of the lid.
(below) The lines on the middle of the inside of the lid are just splitting of the wood. I could fill it, but no bid deal. Again, this isthe inside of the lid.
(below) The top of the lid. It still needs to be sanded. I filled the holes left by the nail gun w/ wood filler to get a clean, smoothfinish. I will paint when it all dries.
(below) A close up of the sides of the lid meeting the top. I still have to smooth out all of the ended. The important piece is to avoidthe gaps on the outside of the box.
Remember, I am trying to make it look as close as possible to the orange Nike box I posted a few posts down. All I have left to do is attach the hinge and theair cylinder I bought to help the lid stay open and assist my son in opening it. I still have to figure out how I am going to attach it to the lid w/out itshowing though. I also have to put the little details such as the swoosh, the box tag, etc. I'll have more pics tomorrow or thursday.
any suggestions/comments now? anything you think i should do differently?
******************************************************************************************************
Update 10/15/09
******************************************************************************************************
So I finally got the lid painted and put on the box. It painted the lid 3 tmes to match the 3 coats on the actualbox. The hardest part about this step was getting the sides of the lid to NOT scrape the sides of the box. I sanded the inside of the lid sides to makes surethis didn't happen, but I also made sure the lid was as even as possible.
Anyway, here are the pics.
(below) The lid painted
(below) The hinge painted
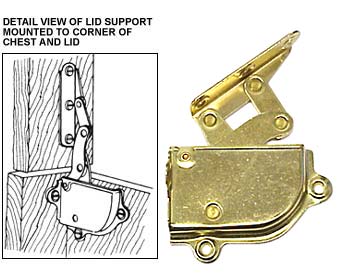
(below) A close up of the painted hinge as well as the air cylinder I will put inside of the box. The hinge is a sheet metal (just the regular piano hingeyou can buy at your local hardware store.) The one I bought was 4 feet long and cut to fit the box. I sanded it a little to see if it would take the paint,but it does NOT. I was told to prime it and then paint it, but I was being cheap and didn't buy a pint of primer for this little bit of paint. You'llsee in the next picture what I mean. Anything that touches it removes the paint.
(below) Close up of the hinge attached to back of the box.
pic above is the gap all the way around the box. I tried to keep it as consistent as possible. Now all I have left to do is install the air cylinder and painton the swoosh(es) and box tag.
I'll keep updating as it gets finished.
******************************************************************************************************
Update 10/22/09
******************************************************************************************************
Well, I finally got the OUTSIDE of the box finished. Techically, I can leave the box how it is, but for the safety of my son, I still have to attach the aircylinder inside the box to prevent it from coming down.
To start this final process, I decided to go over the whole box w/ a fresh coat of paint just to keep the color consistent. After the paint dried, I used someprecut stencils of the Swoosh to spray paint onto the appropriate parts of the toy (shoe)box. To do that, I just printed up a decent size swoosh on a 11x17 andused that for my stencil. I just bought some dollar spray paint from walmart. You can see by the pictures below.
(below) a picture of the stencils I used to spray paint on the box.
(below) how I placed the stencil to begin spray painting.
(below) a picture of the box fresh after all spray painting was done.
Like I said, I finished the outside of the box. Here are the final pictures. Excuse the color though... i think one of the pics were taken by my phone atnight. Either way... here is the final product of the outside of the box.
(below) this is more of what the color really looks like.
It took me a while, but it was a good experience. I plan to make a few more for some of my boys and my brothers. It definitely will be easier the next time.Overall, I had a good experience with trial and error. If you have any questions, feel free to ask them here. I will answer so everyone can see.
If you want one made... and you're local in N.California... PM me. Maybe we can work something out.
Thanks fellas.
(since this is NT) CLIFFNOTES:
--Making a Nike box (toy box) for my son's bday. It will be his new toy box
--Step by Step intructions are in red text.
--Pics for those who just want to see and NOT read the instructions
--I am not finished w/ the box. Might not be for a few days - few weeks
--Updates will come as soon as I get the box finished
I've also had the idea of doing this, so I decided to make moves. My son's bday is in a few weeks and I want to buy him a puppy. he has a bunch oflittle toys here and there, so I had an idea to make him a toy box for his bday... and put the puppy inside of it as his gift. He'll be turning 3.
anyway, I didn't think it would be as time consuming as it has been. I am sure there are better, more efficient ways to make this box than I am about toexplain. This is my first one, so of course I will make mistakes. I am NOT a carpenter nor do I have background in this stuff. I am just doing this for fun.
First of all, I am only using one sheet of 4x8 plywood. I got the one thats already sanded because those extra few dollars saves a LOT ofwork later in the process. Basically I drew it out so I can get the most use of the whole sheet of plywood.
(when making your measurements, don't forget to include the 1/16 - 1/8 of an inch the cuts you make will take off. I learned that the hard way.)
I had the sheet cut at the store as soon as I bought it. that also helped me get the wood home. While at the store, I bought some gorilla glue. This stuff islegit. I would recommend you use this to help securing the wood (in addition to whatever you choose i.e. nails, wood screws, etc.) I also bought wood filler.I chose to have natural wood... and natually, it had flaws. I used the wood filler to fix those imperfections.
Next, I put the pieces together w/out securing them. Don't just start nailing away.
When all of that was done, I started gluing the pieces together. when using this glue, you should clamp the pieces together to make a more secure hold. Since Iam building this at my gparent's house, my gpa let me use his tools. He pretty much has every single tool in the world. You can see below that I used aclamp used for projects like this. I put pieces of cardboard folded in 1/2 so the tightening of the clamp wouldn't dent the wood. If you can't do that,plan the build so you can put something heavy on top of that piece of the box so you can use the weight of a heavy object to act as the clamp would.
The glue (found this out the hard way too) expands. You ca see this in the pictures. It REALLY sticks to the wood... so I would advise you to be careful withhow much glue you use. To take this excess off, I used a brand new, sharp wood chisel and a box cutter. For the excess on the OUTside of the box, I justgrinded/sanded it off. that was much easier and faster for me.
When the glue was dry, I put nails (i used 1-1/2 finishing nails) about ever 8-10 inches apart in both direction... meaning from the front and the side. Thiswill reinforce the box better. I used a similar technique to what drywallers use when installing drywall. I pushed the nail below the surface of the wood andfilled the hole w/ wood filler so you wouldn't see the nail when it was painted. (I tried to at least)
After it was all secure, the excess glue was removed, and the holes were filled w/ wood filler, I sanded the whole box with 180 grit paper to smooth it outbetter. I blew the excess dust off.... and finished it off with 220 grit. I used a compressor to blow off the dust again, but I found that using a clean papertowel or an old shirt gets stuff the didn't come off w/ the compressor. Here is the box all sanded right before I am about to paint it.
Now time for painting. Since the traditional nike box is orange (i think there have been 3 different oranges used in nike boxes) I chose the color I liked themost. You can get color samples from any paint store. The color I got was FLAME from Home Depot.
Here's the box painted 1 time. (it was dark when I finished, so the orange looks different (darker) than it was at this point.
Here's the box painted a 2nd time. Ignore the white spots. there's a tree in the background and the sun was going through)
I want to paint the box 1 more time.... but we'll see. It depends on how it looks after the 2nd one is dry. (I left after painting it the 2nd time.)
I still haven't decided how I want to do the lid of the box. I have playing w/ 2 or 3 different hinges for the back of the box that aren't so big andbulky. The only crappy thing is that the wood is heavy, so it wouldn't make sense to get some weak hinges that won't hold the wood or that will breakeasily. I still have a lot of work to do on it. I want to make it look like a real box, so the swoosh, the box tag, the lid... etc are still to come. I willkeep you guys updated as I get finished. I am busy at work and with my son, so I don't have that much time to finish it. I might not have updated pics fora few days, maybe a week.
let me know what you guys think. any ideas, suggestions, comments?
******************************************************************************************************
Update 10/13/09
******************************************************************************************************
So, I have been working on this box more than I thought I would. This thing is a lot harder (more time consuming) than I thought it would be. First, let me saythat I would NOT have been able to do this without a table saw and a brad nailer. It just makes the job so much easier and so much cleaner.
Well, I went to the hardware store to buy some more wood to so I can experiment with a few ideas. One of my buddies does car audio install.. custom boxes andthat kind of stuff. He suggested that I use a type of wood called MDF (medium density fibreboard.) Most people would recognize it if they have speaker boxesin their car. The wood is more dense than regular 4x8 sheets of plywood (not to mention heavier.) BUT, after the experience I had w/ it, I wouldn't use itagain. First, MDP does not take impact very well. When I would rest the wood on is edge, I would CONSTANTLY have to worry about whether or not it was going tochip/separate. Its like bending the edge of cardboard. Once you mess it up, there's no going back. You can clearly see any and all damage on the MDF wood.With regular plywood, you can be more careless w/ it and it'll still be ok to use.
Anyway, initially I used MDF to make the lid... but after all the nicks and dings the wood took, I got frustrated and said forget it. I decided to go buyanother piece of plywood. The plywood I'm using for the lid was the cheaper version of the wood I used for the actual box. The only difference (other than$1
is that the more expensive wood is pre-sanded. If I would have known that, I could have saved some money building the actual box. Oh well, lesson learned.So, I cut the lid using the table saw to match the messurements of the box. Unless you have precise tools that will almost guaranteeperfection, I recommened using the box itself instead of measuring. I placed a sheet of wood over the box itself and drew lines w/ my pencil as to where tocut. I measured the first time using the MDF wood and I messed up almost a full sheet of the wood. If you're off by millimeters, it wont fit. That was themost frustrating part.
Here's the lid. It has NOT been sanded nor filled in (i.e. the holes made by the brad nailer and the gaps on the inside of the box.)I was going to use a wood filler to fill in the gaps, but I figured I'd use silicone on the inside since its cheaper and it will serve as an adhesive forthe wood. I ran out of silicone last night, so I'll be finishing the rest tonight. I traced out all of the pieces for the lid and cut the appropriatecorners to 45 degrees. You can see how the pieces fit together in the later pictures.
Here's the inside of the lid. The white stuff is the silicone to fill in the gaps. I will eventually put it in all of the gaps on the inside of the lid.
(below) The lines on the middle of the inside of the lid are just splitting of the wood. I could fill it, but no bid deal. Again, this isthe inside of the lid.
(below) The top of the lid. It still needs to be sanded. I filled the holes left by the nail gun w/ wood filler to get a clean, smoothfinish. I will paint when it all dries.
(below) A close up of the sides of the lid meeting the top. I still have to smooth out all of the ended. The important piece is to avoidthe gaps on the outside of the box.
Remember, I am trying to make it look as close as possible to the orange Nike box I posted a few posts down. All I have left to do is attach the hinge and theair cylinder I bought to help the lid stay open and assist my son in opening it. I still have to figure out how I am going to attach it to the lid w/out itshowing though. I also have to put the little details such as the swoosh, the box tag, etc. I'll have more pics tomorrow or thursday.
any suggestions/comments now? anything you think i should do differently?
******************************************************************************************************
Update 10/15/09
******************************************************************************************************
So I finally got the lid painted and put on the box. It painted the lid 3 tmes to match the 3 coats on the actualbox. The hardest part about this step was getting the sides of the lid to NOT scrape the sides of the box. I sanded the inside of the lid sides to makes surethis didn't happen, but I also made sure the lid was as even as possible.
Anyway, here are the pics.
(below) The lid painted
(below) The hinge painted
(below) A close up of the painted hinge as well as the air cylinder I will put inside of the box. The hinge is a sheet metal (just the regular piano hingeyou can buy at your local hardware store.) The one I bought was 4 feet long and cut to fit the box. I sanded it a little to see if it would take the paint,but it does NOT. I was told to prime it and then paint it, but I was being cheap and didn't buy a pint of primer for this little bit of paint. You'llsee in the next picture what I mean. Anything that touches it removes the paint.
(below) Close up of the hinge attached to back of the box.
pic above is the gap all the way around the box. I tried to keep it as consistent as possible. Now all I have left to do is install the air cylinder and painton the swoosh(es) and box tag.
I'll keep updating as it gets finished.
******************************************************************************************************
Update 10/22/09
******************************************************************************************************
Well, I finally got the OUTSIDE of the box finished. Techically, I can leave the box how it is, but for the safety of my son, I still have to attach the aircylinder inside the box to prevent it from coming down.
To start this final process, I decided to go over the whole box w/ a fresh coat of paint just to keep the color consistent. After the paint dried, I used someprecut stencils of the Swoosh to spray paint onto the appropriate parts of the toy (shoe)box. To do that, I just printed up a decent size swoosh on a 11x17 andused that for my stencil. I just bought some dollar spray paint from walmart. You can see by the pictures below.
(below) a picture of the stencils I used to spray paint on the box.
(below) how I placed the stencil to begin spray painting.
(below) a picture of the box fresh after all spray painting was done.
Like I said, I finished the outside of the box. Here are the final pictures. Excuse the color though... i think one of the pics were taken by my phone atnight. Either way... here is the final product of the outside of the box.
(below) this is more of what the color really looks like.
It took me a while, but it was a good experience. I plan to make a few more for some of my boys and my brothers. It definitely will be easier the next time.Overall, I had a good experience with trial and error. If you have any questions, feel free to ask them here. I will answer so everyone can see.
If you want one made... and you're local in N.California... PM me. Maybe we can work something out.
Thanks fellas.